Friday, September 16, 2016

A Name Change, A New Look, and an Unplugged Approach To Woodworking


   A Name Change, A New Look, and an Unplugged Approach to Woodworking


After over 30 years of building various styles of furniture using  mostly power tools, jigs, fixtures, etc. I've decided to pull the plug in my shop. I was given a Stanley block plane that was rather dull. I had no idea how to sharpen  it. Went to a local Woodworking Show and bought a Tormek Sharpening System, sharpened that blade, and never looked back. To me, that one sharp tool opened the door to a handful of wonderful tools. now I do my blades with Arkansas stones and oil, works great every time.

Over time I started to use more hand tools and saws in my work but always relied on the table saw band saw, and planer for that 'quick' sizing of stock. I've though about this unplugged approach for a while and I found the inspiration to make the move after reading Tom Fidgen's books and most recently Joshua A. Klein's Mortise & Tenon magazine to unplug, take the time to feel more connected to my work. With a few exceptions, it h make the as always been more the journey than the destination, I suspect this to be no difference. I'm looking forward to it.

The plan is to first move anything with a plug out of the shop to the other side of the wall.  I will have my Shaker Bench I built, a nice carving bench I purchased years ago, and will reorganize the saw till, plane till, and get everything relocated in one area that is easy to reach. I have a project from Tom's book to start on as well as finishing the Spice Cabinet shown in other posts.

My inspiration and guidance during this next phase of my journey will be the M&T Manifesto. The seven tenants summarize the distinctive and vision of Joshua's publication. You can find a description of each one in the first issue, you will be inspired.

I have started to clean up some of the posts from the past but will keep those posts that were not fully unplugged.

Over the next few post I'll keep you updated on the progress.


Thursday, August 25, 2016

Spice Cabinet Progress- Back At It

After some time off for some travel and a few small projects, finally getting back to the Spice Cabinet shown in some previous posts below). Decided to get on the Line & Berry inlay for the door panel before starting to dovetail the many interior drawers.


The pattern is traced out on the back side of the panel.

Once the pattern is complete, start scribing the lines to accept the stringing.

A little  trial and error here as to how deep the grooves need to be, sneak up on it a few times and it'll come easy after that.

A few different sizes of old dental picks will help clean the scrap trimmings out of the grooves.

The holly stringing needs to be sized before gluing in the grooves. A few passes in this tool does the trick.


Some of the tools used to scribe the lines. I purchased a set made by Lie-Nielsen for this work, I've seen others made these tools, I'm just not that crafty. If you purchase, get the extension for the scribe tool to get to the larger radii.


Finished design on back panel


Wednesday, October 29, 2014

Pennsylvania Spice Box- some progress


 I made some progress over the past couple of weeks, that was to build the back panel and to start on the base and crown moulding. I accomplished both but not without some trial and error. I was determined I was going to make these moulding by hand as I don't have a lot of router bits and sure don't have any that match these profiles. I also resisted using the table saw to hog out a lot of the waste material. Material is walnut.


Crown moulding on the left, base moulding on the right


The tools I used to make the moulding are shown below. A pair of #6 and #8 hollow and rounds, a 7/8" rabbet plane, and a Stanley #66 beading plane which came in handy to cut the bead on the face of the crown moulding.

Base moulding shown in the tray held by a bench dog and tail vise.


The back is a splined  panel made of 1/4" Ash and slides up and into the back dadoes and rabbets.

This is an interesting feature. By removing a drawer and reaching in the front, you lift the back and push out the bottom to remove it. This reveals a secret compartment. These compartments were a popular design feature in 18th century furniture.

The mouldings were a challenge to make as I had never tried doing them by hand before. Sometime ago I had purchased the book shown below with the intentions of learning how to do just that.  
This is a very well written and easy to understand book by Matt Bickford and it removed a lot of the mystery of the process of making various profiles with moulding planes. It's not as easy as it looks but not impossible. As with most tasks using hand tools, patience truly is a virtue. 

Next step is to get the moulding attached to the cabinet and work on the feet. After that the door, then the intricate holly wood inlay. Drawers will be the last step. Will share some more at the next milestone.

Friday, September 19, 2014

Pennsylvania Spice Box - Beginning

Summer fun is about over and it is time to get back in the shop and get busy on some projects that were interrupted earlier in the year. These few photos are the beginnings of a spice box following the plans by Steve Latta. Constructed of walnut with poplar as the secondary wood. Overall size is 22"x15"x11" deep and features 11 drawers. This style chest was used among the 18th century Quakers in PA. A small chest but a ton of hand crafted details.  Minimum power and maximum hand tools will be used for this project, I will post progress as it happens. Excited to get this one going.


Case carcass, all dovetails, rabbets and dadoes are  hand cut


Drawer gallery installed


Photo taken from the project plan page
The chest features a number of hidden compartments such as the slot at the top used to store documents. There is a false back to the center drawer for example, accessed  by lifting the back panel and so forth. Another feature of this box is the line and berry inlay on the door. Very thin Holly strips are used for this and the grooves are all cut by hand as well. Hopefully when it is all said and down mine will look as good as the finished product shown above.

Monday, June 16, 2014

Wedding Ceremony Box

A Wedding Ceremony box, something I was not aware existed until I was asked to make this as a wedding gift. During the ceremony, the bride and groom place two glasses, a bottle of wine, and two letters in the box. The top is secured any number of ways, and it opened at a some predetermined time, 1, 5, 10 years and so on. 


 The wedding invitation was printed by Steam Whistle Letterpress, Main St. OTR,  Cincinnati, OH, and inlaid in the top, covered with no glare glass and captured with a thin oak frame.


The glasses and bottle rest in support cradles designed specifically to fit each. The cradles are lined with thin craft foam.

Top is secured with a brass ball on each corner.  


This box is constructed from reclaimed oak estimated to be over 100 years old. A coat of General Finishes Shaker Maple and antique brown wax to highlight the grain. Inside the top are foam pads for the glasses and since the bottle will be stored upside down, a small block with foam to keep the bottle from tipping forward.  
Size is approx. 12x15x6.

A sectional sofa for a condo deck. I was asked by Uptown Interiors in Warsaw, KY to build the framework for a clients sofa. The ottoman can double as a table, or have a cushion on top. Cedar on all of the exposed areas left to age naturally. This was a "design as you go" project. Uptown made the cushions and she will finish the deck in the a beach theme requested by her client.
 The frame work I used standard construction grade material and covered the "show" sides, including the backs, with cedar. No finish as the cedar will age naturally.

Units are 30" x 30" by 25" high (in the back), the unit closest to the door is 38". The ottoman will double as a table with the cushion removed. 

I wanted to get the "rustic" look requested, I tried to use random sized cedar for around the ottoman. Overall I am pleased with the the finished project 

Saturday, December 14, 2013

Sofa Tables

I was contacted recently by a friend of my neighbor to build 2 - 55" sofa tables for her home. She had difficulty finding exactly what she wanted at various furniture stores or on-line, or anything not made in China
Finished tables in clients home- 55" x 11" x29"
Her main request was she wanted reclaimed wood. With some help from a couple of contacts, I located some reclaimed quarter sawn white oak from a guy in SE Indiana who tears down barns and not only sells the lumber, but produces some outstanding furniture from it. Most of what he has is 100 to 150 years old from barns and other buildings in the SE Indiana, Northern Kentucky, and the SW Ohio area.
The other requirement was a marble, slate, or limestone top. The tops you see are marble from a vendor in Madison, IN.


A good part of this entire build was making the mortise and tenon joinery. The rails shown above are for the lower shelf, 4 required.


For reference, the legs are 2" square (not shown), and  the shelf slats here are 2 1/8" wide, all I needed to do was to get all of those in the opposite mortise at the same time and clamp it before one end or the other came apart. Took me more than one try, with a few choice words :)


Success! As usual, the second one went together a lot quicker than the first


The finish on the wood is two coats of Tried & True Danish Oil. This really brought out the character of this wood. I really enjoyed working with this reclaimed lumber. Hard to explain but this reclaimed white oak seem to cut a lot easier than the kiln dried material I am used to and the "defects", nail holes, worm tracks, knots etc, made it look all that much better.


Sunday, September 15, 2013

Wooden Chest Cooler


My neighbor asked if I could build this cooler for his sister’s birthday present with no instructions as to what he wanted for a design, so I designed as I built.   Some minor surgery on the cooler was required, removal of the handles, hinges mostly, and some slight modifications to the sides to square up the chest. 


  It is rough 1x cedar for the chest, legs, and lid, the cooler is supported with 4 – 2”x4”s spaced evenly across the bottom and attached with pocket hole screws, the legs, large panels as well as the top panel were built with pocket hole joinery. 


The drain is attached with 5/8" clear tubing to the cooler and a pvc fitting to the valve
He picked a 5 day cooler approx 42”x18”x20” and the overall height with legs is 38”. Hope they ice down plenty of cold ones for the party. 

Saturday, March 9, 2013

Cherry and Maple Nightstands Complete


Completed the second of two nightstands for our bedroom. This project has been on the list for longer than I can remember so I am getting closer to finishing the bedroom furniture. The cabinet sides, top, and door frame are solid cherry. The sub top, divider, and bottom panels are Baltic birch edged with 1/4" cherry strips. The hand cut dovetails are still a challenge for me but I am getting better, practice makes perfect I guess.


There are faster ways to cut tenons but for me none more enjoyable than cutting them by hand. These are the rails for the base. Each leg has 2 mortises that I drill on the drill press and chisel to size.


This is the finished base prior to finishing. The corner blocks add strength and also a way to attach the cabinet.


Edge jointing the cherry to glue up panels for the cabinet with a No.6 which for me is a good size plane for this type of work. The Stanley No.386 attachment works great in keeping things square.


Assembled cabinet with the door installed. The hinges make the door adjustment a breeze.


Another view of the finished nightstand. The finish on the cherry is Tried & True oil, 2 coats, and I add a light coat of wax. The base is finished with General Finishes Black. I wanted a nice contrast between the base and the cabinet.


The next project for the bedroom will be a dresser that matches the style and finish of the nightstands. Need to get this done before it warms up and the golf courses open up :)

Monday, November 19, 2012

Bench Build - Complete !!


The Shaker style bench is now complete and ready for use (officially), I was using it prior to the finish coat for some other small projects.


 The finished top dimension is 26" x 83", I left it a little wider than the plan to allow for a couple of round bench holes to accept holdfasts for the Moxon vise. Even at that width, there is still plenty of room all around the bench. I used Tried and True wipe-on oil for all of the unpainted pieces.


Back view showing the back panel routed to give the impression of ship lapped boards. 


 Tail vise view and overhang required for all the hardware under the bench top.


 Front view shows the square dog hole strip that runs the entire length of the bench. I do have a few more bench dogs to build, and the plans are clear on how to do that, even though it is not the most exciting part of the build.


 The deadman and rail 


The parallel guide bar prevents the leg vise chop from racking, simply slide the bar into the hole close to the width of the board you have in the vise.

One thing I can say is this bench is solid, and heavy! I had a chance to edge join a board and I detected absolutely no movement at all, solid as a rock. This bench was a pleasure to build. The quality of the hardware and plans are outstanding. I had some challenges along the way, but what fun would it be if it was easy? I learned a lot along the way and would be glad to share if someone is thinking about building this bench.

Saturday, October 20, 2012

Bench Build - Next Steps


The bench build continues to go well, I have finished the parts for the front glide vise and I my goal is to get this installed and adjusted this weekend.


Glide vise parts
The parts above are hard maple, the chop was a challenge. It is 2 5/8" thick at the top and tapers down to 1 9/16". I tried to resaw the glue up on my band saw, but it was a struggle, so I stopped, got out the #40 scrub plane, the #6 jointer, and the #4 smoothing plane and had my workout for the day/week/month.

One thing I learned is that you can tap hard wood to accept machine screws. This may seem elementary to some of you, but I had never thought to do that before, and is suggested in the plans to do so.

bench view with leg attached

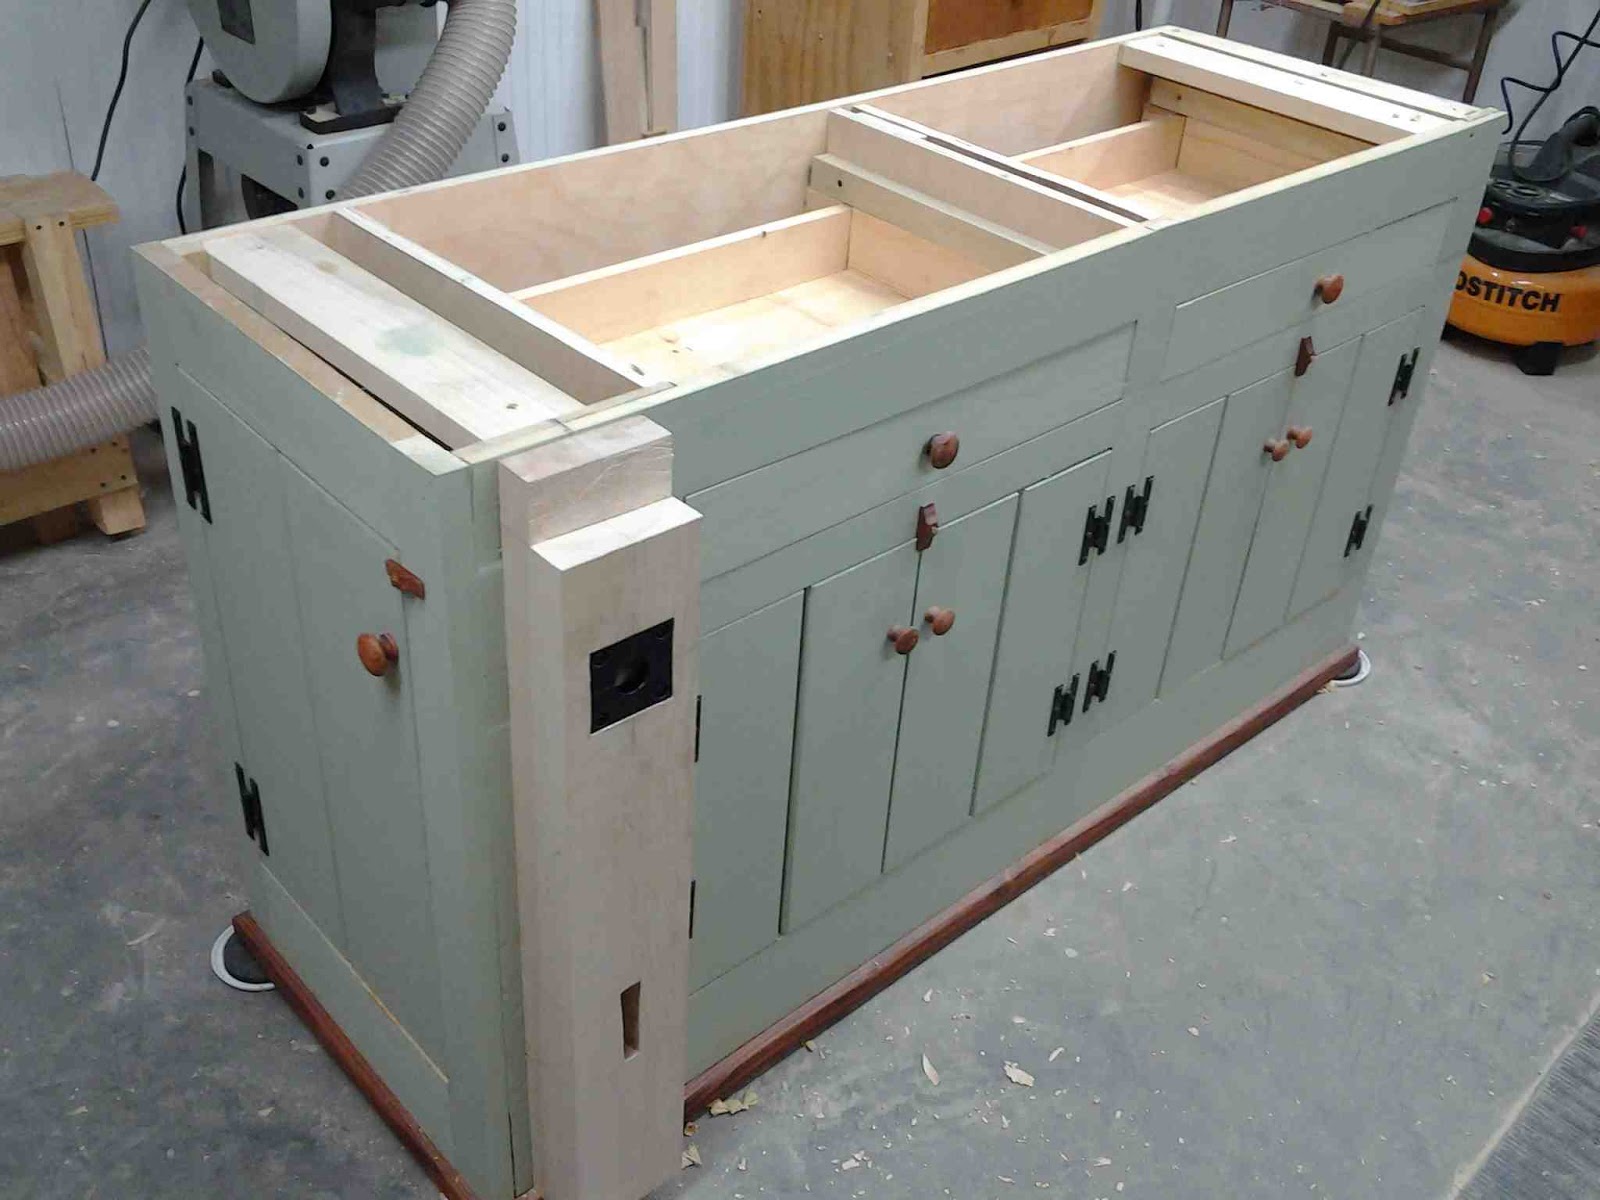
I went ahead and painted the unit, oiled the knobs and door stops and the bottom foot of the bench. The plan calls for a 4/4 foot I believe and I felt that would make the bench lower that I like so I used simple 2x4 and with the thickness of the top will put the height where I want it.  I can touch up any dings later. The finish is General Finishes Milk Paint Bayberry Green, hardware supplied in the Bench crafted hardware pack.

Additional bench view
The remainder of the work will be on the top and the tail vise. I have all the maple I need barring any major screw ups, and I had to use hard vs. the preferred soft maple. My wood monger in Indiana did not have a good selection of clear soft maple so rather than wait I switched to the hard maple. 

So far the build is going well, there are some challenges which keeps things interesting, and I am learning some new techniques along the way.


Wednesday, October 3, 2012

Bench Build...Doors and Drawers....

 After a commission job, and a very nice trip to Pigeon Forge/Gatlinburg, I completed the next major step in the bench build, adding the doors and drawers. 


The doors are 1" poplar and are attached with the hinges supplied in the hardware pack from Benchcrafted, the knobs are cherry as is the door latch on the side door. I still need to make two more.


The half blind dovetails on the drawers are hand cut, I used pine for the drawer sides and back, the big reason was I ran out of poplar for the drawers, and I had the pine on hand from a previous job.


Happy with the results of the dovetails, the more I cut the better they look (to me anyway) and this step was one of the more enjoyable parts of this phase of construction.

Next step. Front Leg Vise construction and installation, final fit, and finish, of the drawers and doors, and painting the cabinet in a yet to be determined color of Milk Paint.

Monday, August 13, 2012

Back At It..Bench Build Underway


Finally getting started on the new bench for my shop and am excited with the progress to date. With respect to Monsieur Roubo, Shaker is my style and I am building it using the plans, and hardware, purchased from Benchcrafted. The level of detail in their drawings is outstanding, the hardware package is complete, and the 3D available in a download are a plus.


Shown above is the basic carcass made from some pretty decent birch ply I bought at HD of all places for a reasonable price, was surprised at the quality of the plywood, haven't found a void yet. It is sitting on an old bench that moved with me from TN that was sitting in my garage. I drilled some holes in the top for the holdfasts, and use the Benchcrafted Moxon vise I built to use as an end vise. It is working out great, but can't wait to get the real deal.


Case with face frame and end frame dry fit. Both frames are constructed with 5/4 (net 1") poplar. If you look at Benchcrafted's website, you will see the base of the bench is painted , so poplar is a good choice for the outer frame.


Frames and back attached, all that is needed for the bottom is the "foot" It is a frame made of 1X3 poplar. I may change that thickness once I determine the overall height of the bench.

As of this posting, the door for the end panel is mounted, the doors for the front are made, the drawers are next. 

This will be one solid bench. The advertised finished weight will be around 350 lbs, certainly sturdy enough to handle any hand tool work.

A finished photo can be seen at Benchcrafted website and for those of you attending WIA in the Fall in Covington, KY, Jameel my have his bench there at the show.

More to come as I hit significant milestones during the construction.

Wednesday, July 18, 2012

Blanket/Baby Chest


I was contacted by a client to discuss building a chest she planned to donate to the
St. Cecilia Pregnancy Support Center. The chest is going to be placed at the entrance of the church and parishioners will be asked to donate items for a new born. Once filled, the chest and it’s contents will be donated to a lucky mother.


Overall size - 36" x 20" x 28"
 Made using common pine, I hand cut all dados and rabbets for the case as well as the top slats. This plan was one of the very first projects I built over 25 years ago when I first started woodworking .
Sliding drawer, back trimmed to clear center mounted hinge


Internal drawer and the coopered top make this chest a little different than some others out there. The slats are attached with brass screws and finish washers.


The center mount hinge is child friendly, as it will stop and hold in just about any position to keep hands from being pinched. The top actually has to be pushed close.

Bull nose case trim was made using my #66 Stanley Beading plane with L/N replacement blades.

I really enjoy building this design, and given I was under no real time constraint; I was able to improve on my hand tool skills.

Client chose Old Fashioned Milk Paint, Buttermilk, for the finish.